

What To Bring In A Bike Repair Kit
Share This
Considering a tubeless tire setup for a long international trip? Or just hoping to take flatless bikepacking outings in your own backyard? Hither's our complete field guide to tubeless with a total tubeless tire repair kit, how-to videos for repair and setup, plugger options, and tips from the route…
Despite the fact that most of the mainstream mount cycle world has converted, many bikepackers and bike tourers remain cautiously hesitant to transition to a tubeless setup, especially for large long-altitude trips. Nosotros get it. For folks who haven't performed their own tubeless conversion, it can seem like a daunting task. To some, it remains a dark art… or at least, a complicated operation that requires special skills, a compressor, and general mechanical savvy to successfully complete.
But we've put this guide together in hopes of convincing y'all otherwise. In our stance, tubes have long been expressionless. Merely go for a long dirt road tour in South Africa. Or spend a few days out on the Arizona Trail. Or flop downwardly a rocky trail in backcountry Peru. Never having flats rules… menstruation. Combined with the ability to run lower tire pressures for a more than compliant ride—peculiarly given the popularity of larger volume tires and wider rims these days—we think anybody should be running tubeless tires at this indicate. Not only are most rims and tires at present optimized for tubeless, many new bikes are ready to convert, or are already tubeless out of the box. In addition, there'due south a multitude of great tubeless repair tools and pluggers on the market, making repairs piece of cake once you have the nuts down.
To help demystify the whole procedure, here's our full field guide with videos, tips, tricks, and a full tubeless repair kit to get y'all started and proceed you rolling. We encourage you to give it a try; experience is more valuable than anything. Further down the mail service, yous'll likewise find two full video guides that nosotros put together. Simply first, some basics on tires and rims.
Tubeless Rims
Although about modern rims are "tubeless ready" these days, in that location are nonetheless new bikes that get specced rims that are non. The virtually prevalent feature on a tubeless ready rim is that the rim bed features bead-locks, or minor ridges in the flat section of the rim profile that help prevent burping (when the bead momentarily breaks and air is burped out). Meanwhile, a properly designed center channel makes a loosely mounted tire "grab" air and snap over the bead locks. The latter is the fundamental to their ease of tubeless tire installation.
Tubeless Ready Tires
Although you can often use standard tires for a tubeless setup, a tubeless ready (TR) model will likely seal better due to its optimized bead pattern. Y'all'll appreciate this all the more when installation atmospheric condition aren't optimal. TR tires too tend to have reinforced sidewalls; given that a tubeless tire is run at lower pressures and tin be more than susceptible to sidewall cuts, this is peculiarly welcome. If TR models aren't available to yous, nosotros prefer tires with lower TPI counts for long-altitude travel.
Tubeless Tire Setup
Setting upwardly your wheels and tires tubeless isn't every bit hard as you might think. Sentinel our video setup guide below, along with some tubeless setup tips. Also, coil to the bottom of the page to discover our stride-by-step guide to setting upwardly tires tubeless before and subsequently flying with your bicycle.
Proper Tubeless Tape Job
Properly taping the rim is crucial to a successful tubeless setup. Start past cleaning the inside of the rim. Use rubbing alcohol or a degreaser to go any residue or factory finish off the rim. This ensures that the tape will stick. Use the widest tape possible to fit in the face of the rim. As for brands, WTB TCS tape works well and comes in several widths. With the disc rotor facing you lot, tape the rim in a clockwise rotation, which allows the force of the tire sealant liquid to not arouse the record seam (the clockwise rotation of the wheel will generally let the liquid to flow over the seal and not against information technology). Kickoff the record on the confront opposite the valve stalk pigsty and allow a 1" to 2″ overlap. Later on taping, carefully cut a shine hole for the valve stem using a sharp blade.
Employ Tubes First
For a tubeless record job that lasts, we highly recommend mounting the tire with a tube inside earlier setting it up with tubeless sealant. Doing and so ensures that the tape fully seals to the rim and keeps sealant from penetrating under the tape and causing it to peel up over time. Inflate the tube to the typical maximum pressure recommended for your tires and permit it sit overnight. The next day, unseat i side of the tire and remove the tube. This helps the tire create the "retention" of its shape, which aids in the initial setup. Here's a prissy and clear how-to video from WTB for reference.
Tubeless Repair
Here'south our full video guide to tubeless tire repair. Sentinel it, and then scroll down to find important tips, tools, and other information.
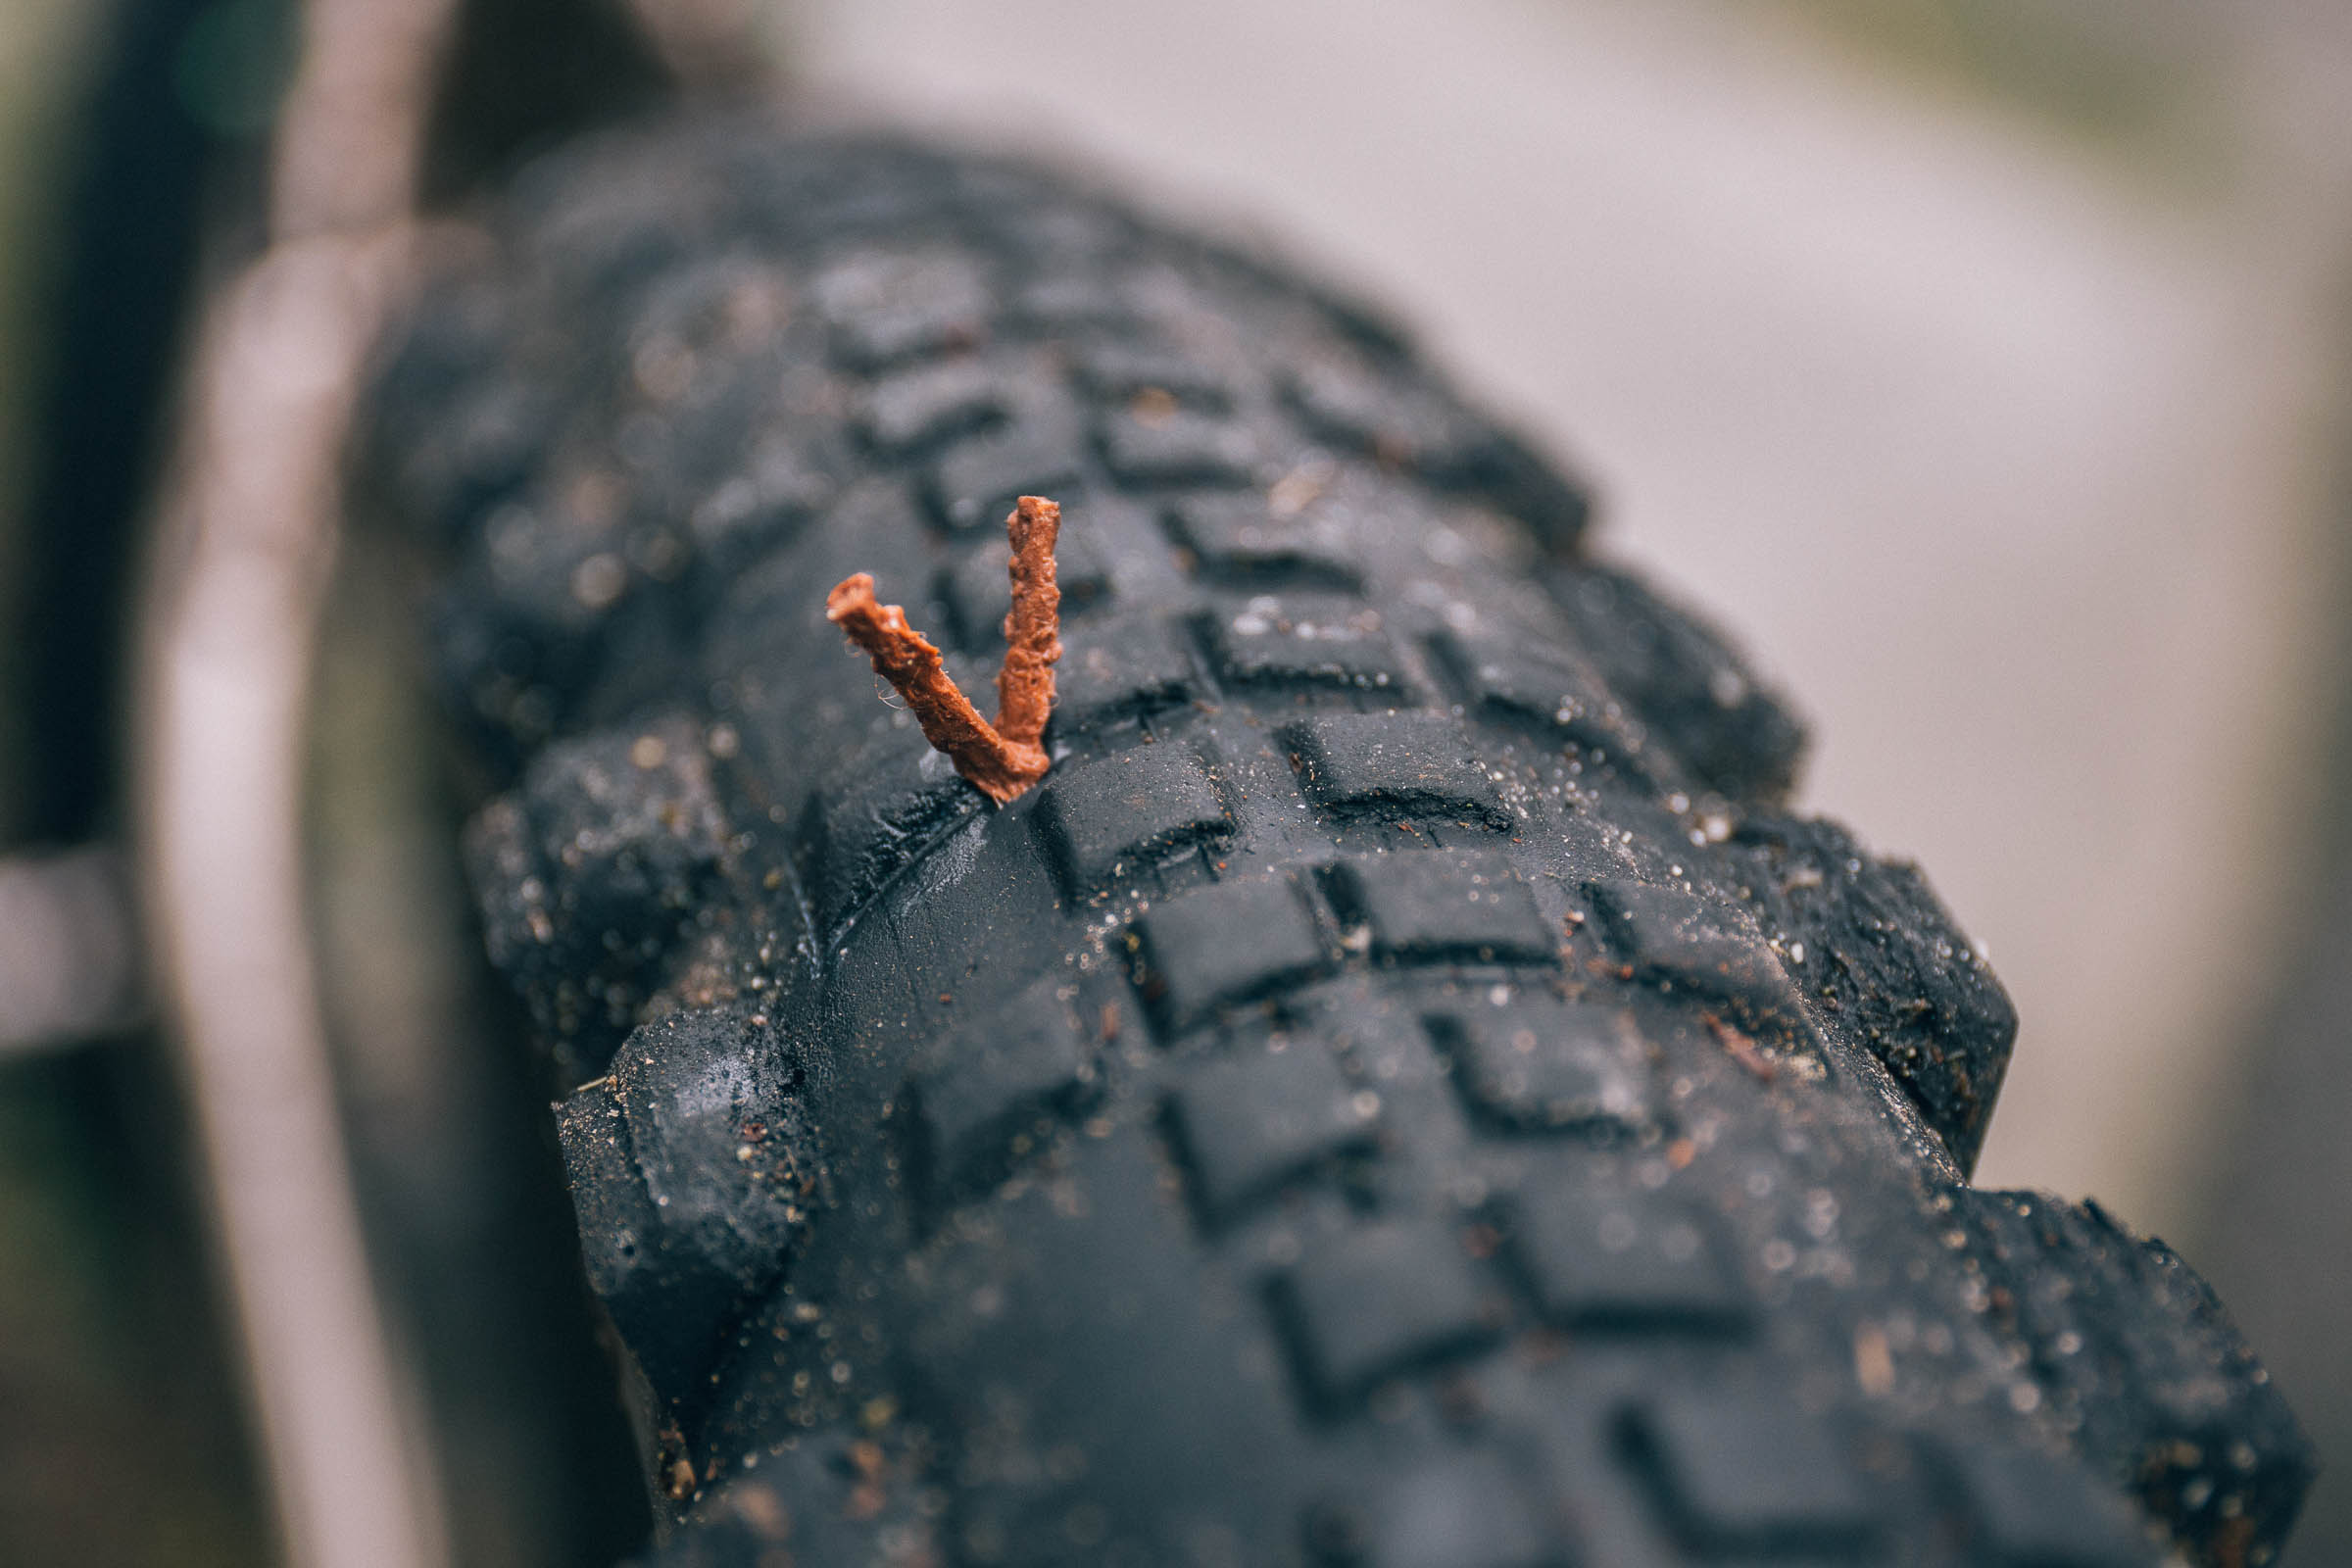
Know how to repair a sidewall
This is a useful skill to larn, given that some tubeless tires are more decumbent to sidewall failures than regular ones. This is specially important when planning a desert adventure, where jumbles of razor-sharp rocks oft grow. Tire plugs will repair most cuts; employ them with the tool provided to blot a tire wound. To fix larger cuts without unseating the tire, conduct a heavy, curved needle and a length of dental floss to sew the cut upwardly commencement. A dab of superglue over the dental floss is recommended. For longer, ii" to 3" gashes, add a section of sidewall cut out from an one-time tire, using Shoe Goo (REI sells small containers) to glue in the boot after sewing the cutting. Allow the glue dry overnight with an inflated tube in place to hold pressure on it–it's rare to accept a cut then bad that you can't expect till nighttime to do this. If your repair won't hold, brand certain y'all take a couple of inner tubes on mitt. Just be sure to remove all the thorns from the casing before you fit it!
Baby your spare tube(s)
Although one tube is often enough, we'd always recommend conveying at least ii spare inner tubes when heading overseas, especially if you're running an unconventional tire size. By and large speaking, your spare tubes can exist ultralight models, as it'southward unlikely they'll exist needed. Just make sure you babe them! It's easy to leave them languishing in the bottom of a frame bag, where they're prone to abrasion. Nosotros wrap one in tape and attach it to the bike, and store another in a sparse sock for protection. Some use a ziploc bag with babe powder, as legend has information technology a little talc allows the tube to motility inside the tire, and may help eliminate compression flats from twisted during installation. If and when they're needed, be sure to bank check your tire thoroughly first. Most likely, it will be riddled with thorns or other debris. In a compression, you can ever run conventional 26" tubes on a 29er, or even a fatty cycle.
Tubeless Tire Repair Kit
We've posted a full-diddled bikepacking repair kit in the past, but hither's the tire repair kit of the time to come. Start past thinking less about tubes and more almost repairing your tires and keeping them sealed.
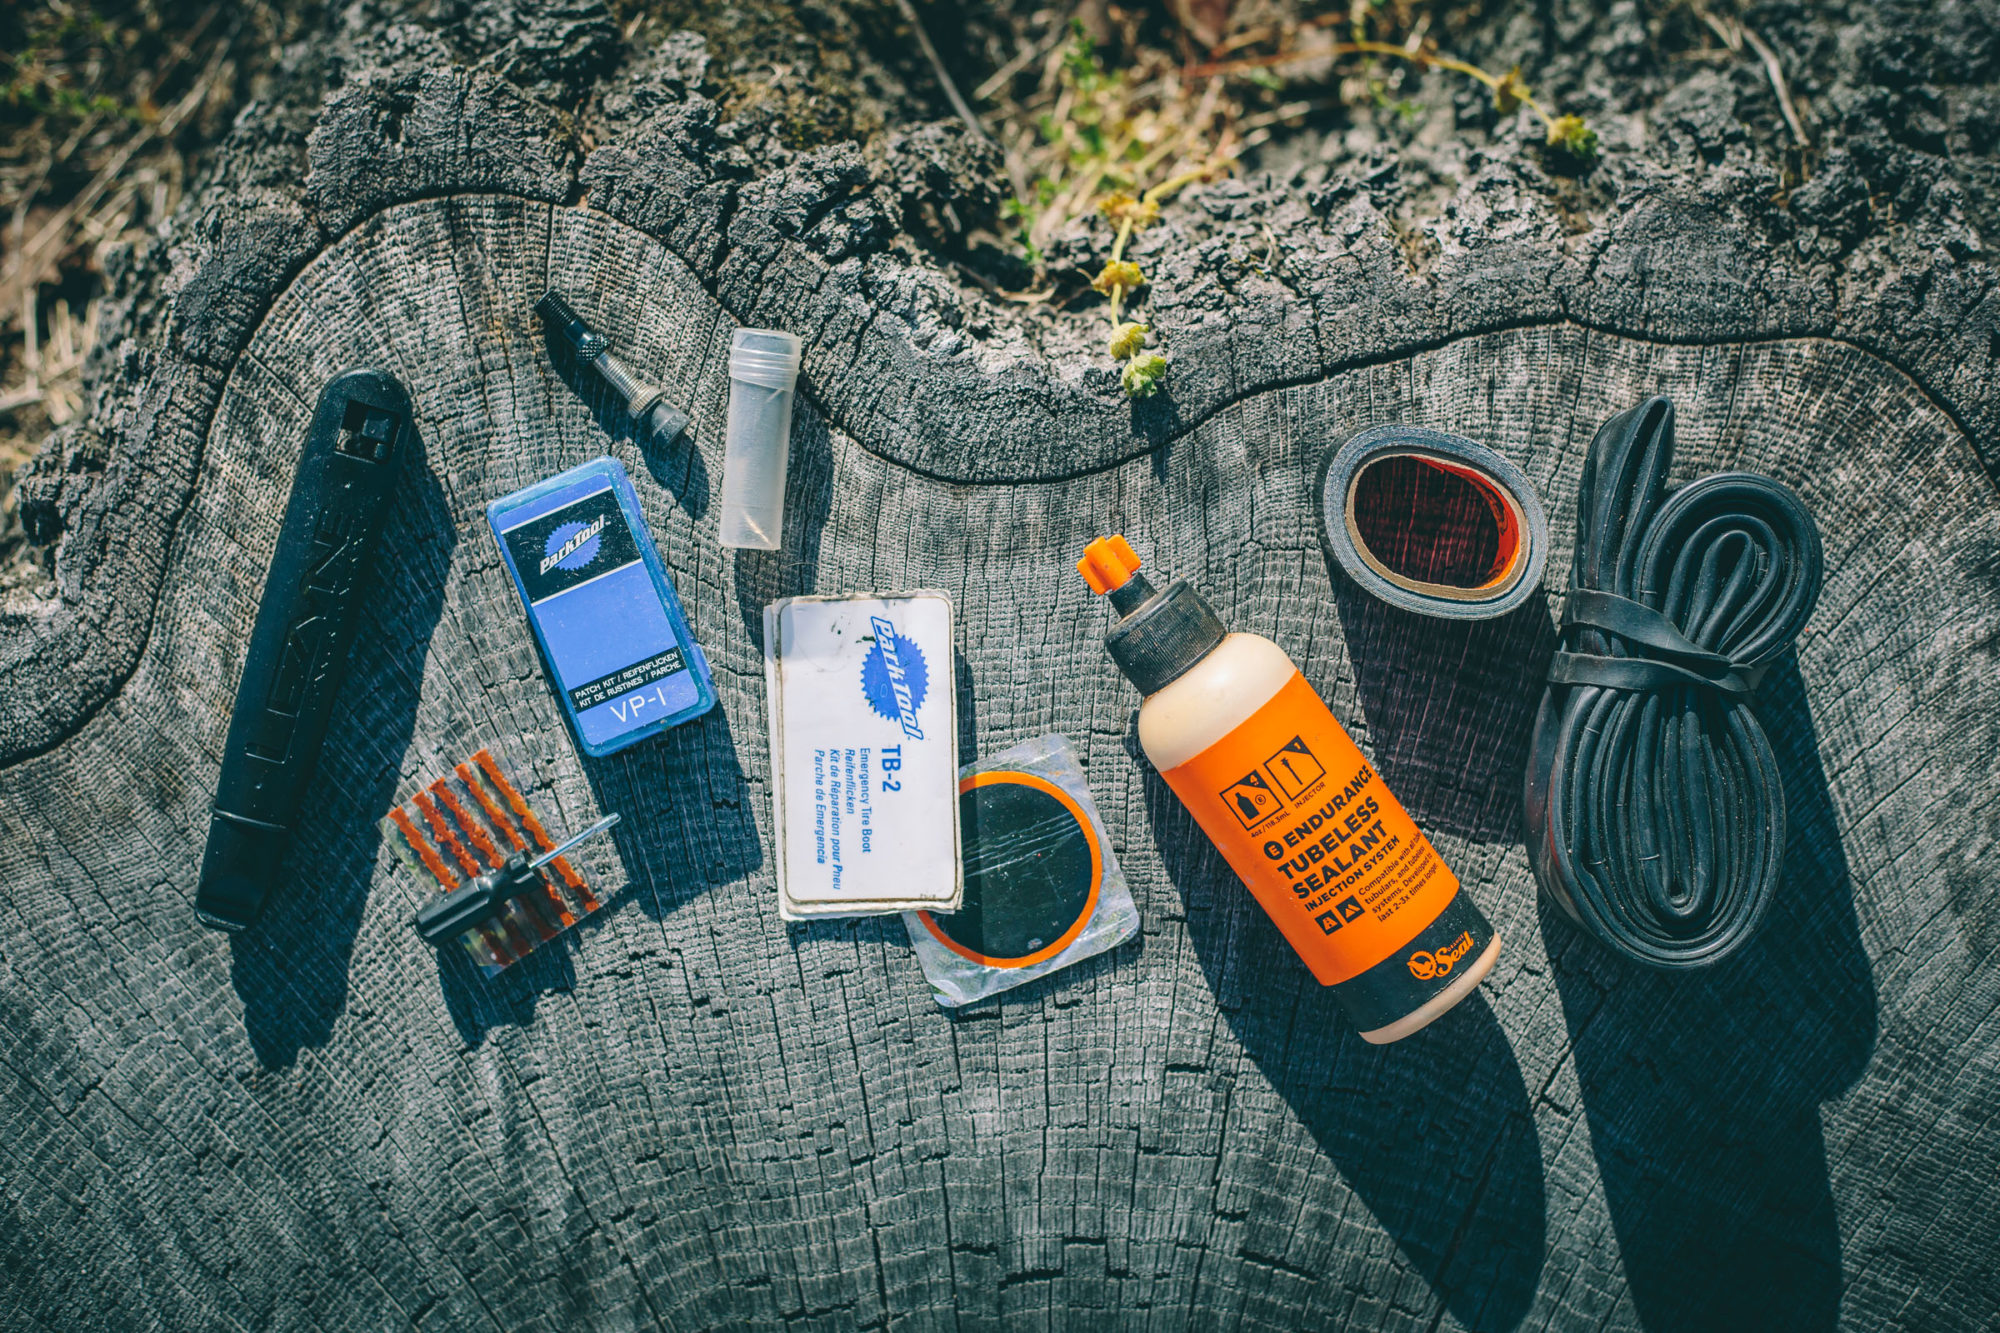
Tire Sealant
Although this may vary depending on tire volume, we recommend carrying 2oz of sealant for small-scale twenty-four hours rides or overnighters, at to the lowest degree 4oz of sealant for trips upwardly to a few weeks, or for actress long trips, brand it 8oz. Orange Seal comes in handy 4oz injector bottles. Orange Seal Endurance is a favorite for several of united states hither.
Tube(s)
Always carry at least one tube. To be ultra rubber or for longer trips, carry two. And as mentioned above, exist sure to take extra care of it by storing information technology in a Ziploc bag.
Gorilla Tape
Coil a dozen or and then winds around your pump. Gorilla tape can exist used to aid with a tire tear or to re-tape a rim, in addition to a ton of other miscellaneous uses around camp.
Patch Kit
Carrying a patch kit is a must. In the outcome of having to utilise a tube, you'll likely need to patch it down the route, peculiarly if yous are traveling through desert landscapes where thorns or goatherds are prevalent. Pro tip: brand sure the cement isn't dried out and the sandpaper is in good shape. Also, alongside a tube, nosotros've used patches to seal pocket-size sidewall cuts, much like a tire boot.
Super Mucilage or Shoe Glue
Super glue or shoe glue can aid help in the repair of a tire tear in the tread area or sidewall. You tin even put mucilage around a plug for additional back up, or on the adhesive side of tape and create an ultra strong bond.
Spare Valve
It's like shooting fish in a barrel to damage a valve, take ane clog up, or fifty-fifty loose the cadre while working on a trailside repair. So, comport an extra. They're modest enough.
Tubeless Plugs
These work well for punctures that are too big for the sealant but non then big you need a kick. It should provide a permanent repair for most normal punctures. Find a full list of plugger options below. Also notation that if y'all are out of plugs, you can wedge in bits of material, rope, or other sealant absorbing materials to end a leak. This can exist especially handy if the hole is larger.
Curved Needle and Thread
A heavy duty curved upholstery needle and nylon thread are useful for fixing larger cuts without unseating the tire. You can too use this to repair a bikepacking bag, if need exist. This looks like a suitable option.
Piece of former tire sidewall
For two-3″ gashes, this can be glued into place.
Valve Core Tool and/or Leatherman
Although a dedicated valve core removal tool is best, the pliers on a Leatherman work. Even so, you lot might hazard messing up the threads if yous use a pump with a threaded head. The spoke wrench on your multitool may piece of work to remove valve cores, too. If you lose your valve core tool… whittle one from woods! (see photograph)
High Volume Pump
Terminal simply not least, a skillful pump is a must. One of our favorites is the 100cc OneUp EDC pump ($59). As well, the Lezyne Micro Flooring Drive HV ($65 with guess) has proven useful and durable. The latter is a bit more than powerful, merely the screw-on caput can exist a fiddling annoying, causing the unexpected removal of the core when unscrewing it from the valve. And if you'd rather non have a larger pump, you tin can besides make your own tubeless tire inflator.
Tire Pluggers
With a proper tubeless setup, and by and large tough tires, it'southward not often that you lot have to resort to tire plugs. However, they're an indispensable part of a proper bikepacking repair kit. And since tubeless tires have become ubiquitous with modern mount bikes, there's a wealth of tire pluggers on the market. Most are based around the classic tiny screwdriver-esque mini-plugger that's used to insert small viscous plugs, aka bacon strips. These integrate a similar tonged metallic fork into some other tool, instance, or handle. For nearly of these types of pluggers you tin buy the plugs separately. Others, such as the Dynaplug, or Stan'southward Dart, apply proprietary plugs. Find a listing of some of the more than popular options below. Annotation that in that location are a few affiliate links here. We prefer that y'all buy from and support your local cycle store, simply if you must buy online, we get a very small kickback if you purchase via these links.
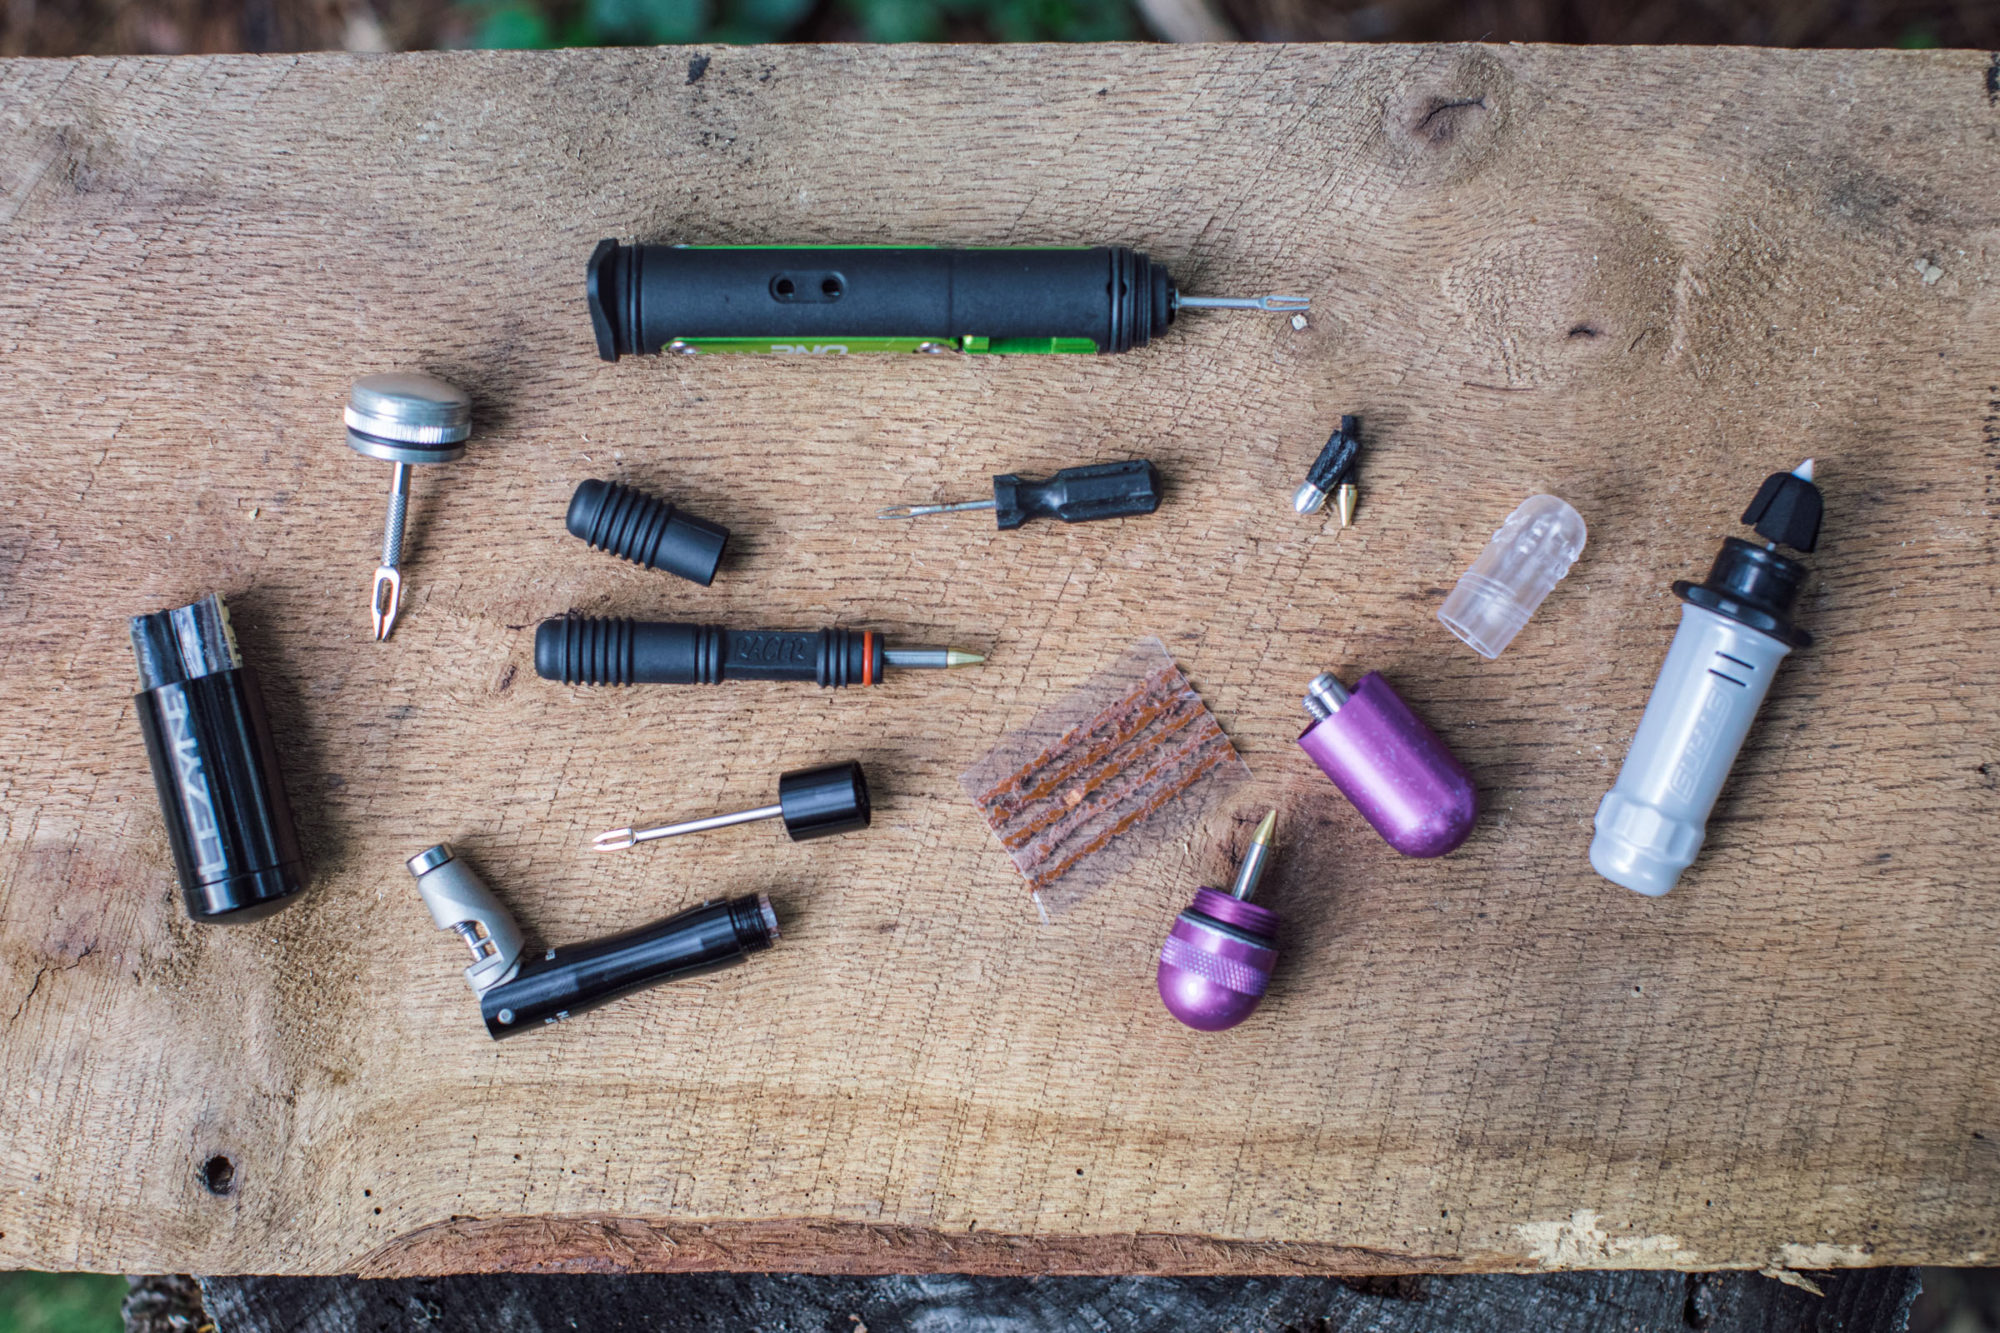
Genuine Innovations Tubeless Repair Tool
The Genuine Innovations Tubeless Tire Repair Kit is the most bones and cheap plugger on the market. For just over $6, you lot become the miniature screwdriver-like plugger tool and "Side of Salary" (five rope repair plugs). Information technology works, it'south cheap, and information technology'southward adequately piece of cake to employ. $half dozen.38 on Amazon.
Dynaplug
The Dynaplug Micro Pro tubeless repair kit is designed to be a quick and like shooting fish in a barrel puncture tool. The crux of the patented organisation is a two-slice aluminum body with a hollow stainless steel insertion tube that'due south threaded into the handle. The tube is preloaded with a repair plug where information technology sits in place, ready for activity. The repair plugs are each made of a proprietary rubber-impregnated cord mounted to a pointed, non-abrasive contumely tip. The other side of the "pill" features a honeycomb of tools, including an awl for clearing the hole and a modest knife for cut off backlog plug material. We've used 1 quite a bit and they are certainly the most user-friendly plugger nosotros've always used. Read our review here or pick i up at Dynaplug's Amazon store for $59. Dynaplug also makes the Racer, shown to a higher place, with the larger edgeless-stop plug for bigger tears on one side and the smaller plug on the other. $49 on Amazon.
Wolf Tooth EnCase Bar Kit One
The Wolf Tooth Encase Bar Kit Ane is a handy toolkit that stashes in your bar ends. One side has a multi-tool and the other has a chain breaker and a threaded cap that reveals a tubeless tire plugger, as well equally a hollow bedchamber containing a five-pack of small tubeless plugs. It works similarly to a standard miniature plugger tool and uses the same plugs. Read our review hither. Y'all tin notice the Bar Kit 1 at some bike shops or purchase i online for $120.
OneUp EDC Pump
Similar to the Wolf Tooth Encase, OneUp'south EDC Pump and Tool has a small cylinder with a threaded cap. On the inside of the cap is a tubeless repair tool and the cylinder has enough room to store a dozen plugs. The EDC Pump is one of the all-time we've used and having the tool and tubeless repair kit all within makes information technology a no-brainer for day rides or bike trips. Read our review here. The full EDC system isn't cheap. You lot have to buy 3 different components: the pump for $59, the Tool for $59, and the Plug and Pliers Kit for $39. But, nosotros've been using one regularly for several years and take null complaints.
Lezyne (Oversized Tire Plugger)
The Lezyne tubeless repair kit features an oversized repair fork and oversized plugs. These are double the size of typical tubeless plugs, so certainly better for larger holes and tears. Lezyne plugger retails for $19.99.
Granite Designs Stash Tool
As function of Granite Designs' Stash Tool line, the Stash Tire Plug uses an expandable safe plug and aluminum cap to tuck away in the finish of your handlebar. An aluminum sleeve houses a fork-way applicator, reamer, and four tire plugs, providing a sleek and hands attainable domicile for all of your tire plugging needs. Read our review here.
Stan's Dart Tubeless Repair Tool
While other pluggers, such as the Dynaplug or typical "salary strips," are designed to wedge sticky safe strips into a puncture, the Dart'south plugs feature a hackle of particularly designed material that's engineered to create a chemical reaction with Stan'south sealant to quickly class a permanent closed bond. Nosotros've yet to try the Sprint, but will update this if nosotros practice. The Dart retails for $25.
Sahmurai Sword
The Sahmurai Sword (named afterward the creator Stefan 'Sahmurai' Sahm) uses a unique twist-to-lock design, replacing your bar end plugs with ii affect-resistant safety tools: ane reamer and i fork-style applicator. The plug itself is held by the applicator within the bar, which ways actress plugs must be carried elsewhere. Acquire more over at Sahmurai.com.
Tips for Traveling Tubeless
One roadblock to tubeless for a lot of people is traveling with your bicycle—especially travel that involves flying. For the most part, y'all can set your bike up tubeless beforehand, and only add a trivial extra sealant and inflate your tires upon landing. Away from the comforts of your workshop or local bike shop, this might seem challenging, but with the right rims and tires, and a niggling grooming, it's actually pretty easy. Hither are a few tips we've learned over the years.
Put Several Rides on Your Tires
It's never a good idea to first a large bikepacking trip on fresh tires, regardless. Tires can sometimes have defects, then giving them a proper test beforehand is always a good idea. This also ensures a proper tubeless seal. Four or 5 good rides tin can aid become the sealant in all the correct places.
Use minimal sealant and pack extra
For trips that crave travel, ane method nosotros've used in the past is to be conservative with the amount of sealant yous use initially. This isn't necessary, just information technology saves a mess if your tire seals break in transit. If y'all choose to go this route, bring extra sealant to add to it once you arrive at your destination. As an example, for 2 29+ bikes, we found that one 16oz bottle of Orangish Seal, i 4oz injector kit, and a spare empty 4oz canteen did the flim-flam for calculation sealant upon arrival and ensuring enough backup sealant for a two-month trip.
Pack it properly
If you're flying with your bicycle, let most of the air out of the tires, as required by most airlines. Be sure not to completely deflate the tire though, to protect your rims, and minimise the chance of the bead unseating. When you box your bicycle, rotate the wheels to make sure the wheels are rotated so that the valves are at the acme—this will prevent sealant from settling in the valve and clogging the core.
If the seals get broken
If your bead seals become broken in transit, you lot'll accept to repeat the gear up upwardly process from the condolement of your hostel or hotel. Inflate with a mini pump (as mentioned above, we highly recommend a high volume pump similar the 100cc OneUp EDC, or Lezyne's Micro-Flooring Drive HV). If you lot're having a hard time getting the dewdrop to push into place while pumping vigorously, attempt working the bead against the bead-lock lip. Sometimes it helps to have a friend concur the bicycle off the ground, while an extra pair of hands can also aid move the bead toward the rim while you're pumping. If such hands aren't available, we've also found that two Bearish Junk Straps to cinch the tire into place tin can actually help. Failing this, a trip down a local mechanic with a compressor should do the flim-flam. When the tire is inflated, check that it's seated evenly. Extra pressure will more often than not encourage it to snap into place. If non, deflate, moisten the bead with soapy water, and try again.
Accept whatsoever tubeless repair tips or tricks to share? Or stories from the road? Leave us a comment below…
Please keep the chat ceremonious, effective, and inclusive, or your comment will be removed.

Source: https://bikepacking.com/plan/tubeless-tire-repair-guide/
Posted by: longtraccivo.blogspot.com
0 Response to "What To Bring In A Bike Repair Kit"
Post a Comment